
The Most Luxurious Articles
3D Diaper Extravaganza

If you came to learn about a challenging 3D project, you came to the right place. So either you got here because you too love the art of 3D diaper-making or you happened to be trolling the internet late at night and realized your life wasn’t complete without seeing how this story turns out. Well, let’s face it; every one of us has at one point or another worn diapers, some more recently than others. But thinking about making a 3D diaper isn’t high on this list of things that need to be modeled. Yet, the diaper has many nuances that challenge even the most seasoned 3D professional. Wrinkles, folds, and the diaper’s overall shape all required some creative trickery in order to achieve the quality we were going for.
Workflow Goals
An important goal of this project was to not only produce a quality animation that met the client’s needs, but to also create a dynamic animation system that would allow for an efficient way of quickly making large changes to the diaper’s shape without compromising the existing animation. I knew that there would be a lot of feedback relating to the shape of the diaper, so I wanted to make it as easy to modify as possible, even being able to make large changes with the art director watching over my shoulder. I especially didn’t want to deal with huge numbers of vertices in order to make basic shape changes. With that in mind, I created a simple flattened diaper mesh, and decided that every bit of animation and shape tweaking would be either done with bones. or through a complex series of some 30 mesh deformers and a large number of morph targets. This allowed animation to be done dynamically, using a series of simple sliders and numerical controls.Animation Controls
Just like a good character rig, an animator should be able to animate the diaper using a set of basic controls without having to deal with the inner workings of any bone or IK system. This is typically done because animation and rigging are two separate jobs done by two separate people. In this case, the animator and the rigger were the same person (me), but I still wanted to have a good system in place–not only for the sake of best practices, but for my own convenience during the animation phase.The bone rig itself is very simple. The front and back bend sliders each control the amount of rotation on the middle two segments. Each child bone rotates a certain percentage as well in order to create a nice curved shape. A similar technique is used for the left and right flap sliders.
Shape-Shifting
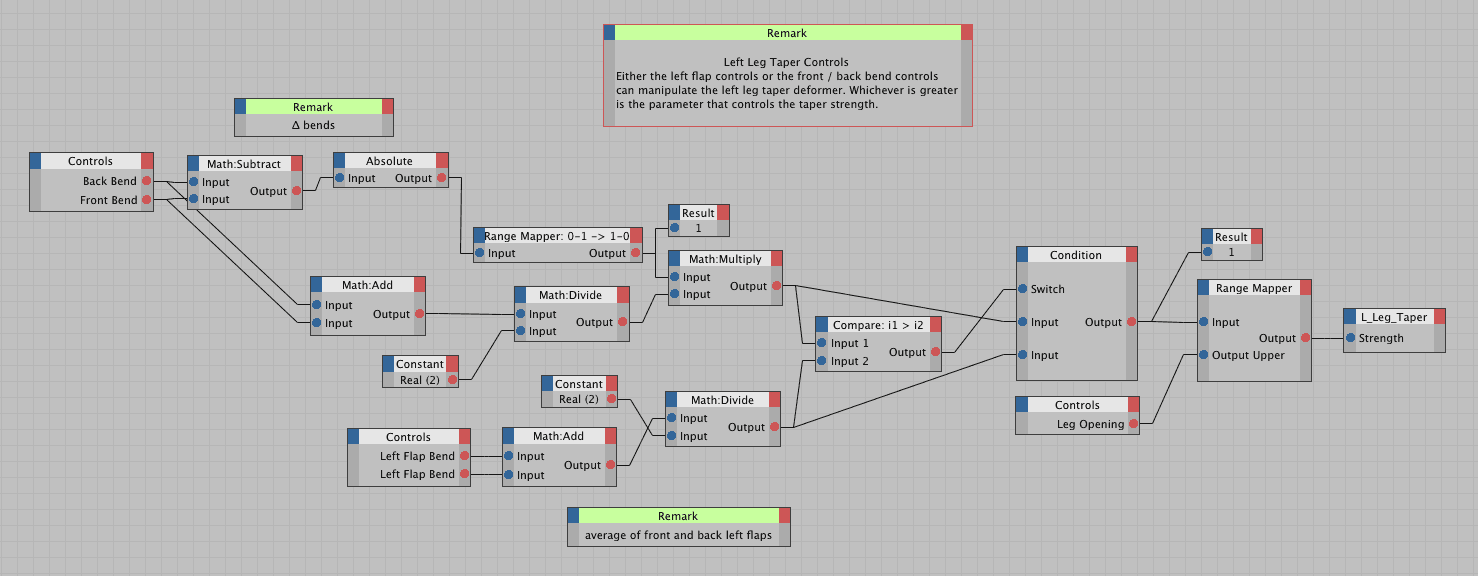
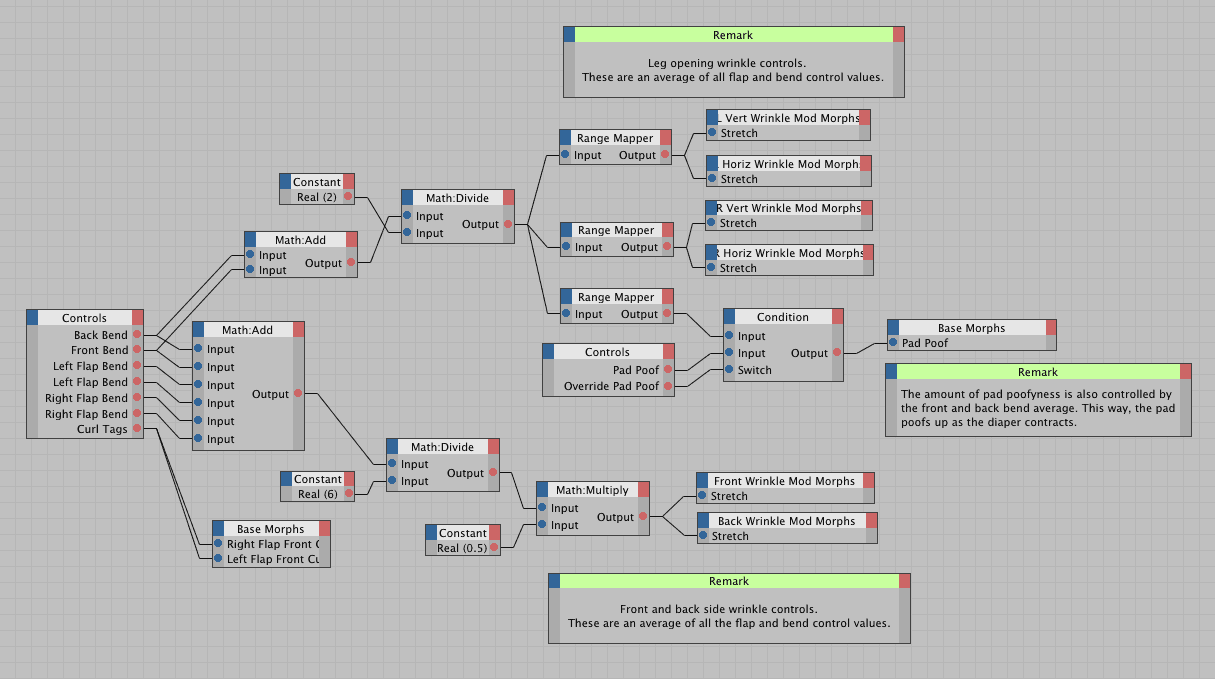
Unbeknownst to the viewer, the diaper’s “on-the-baby” shape is considerably different from its unfolded, flat shape. Simply folding the front and back sides up and the tabs together was not enough to simulate a natural fold. It ended up looking more like cardboard when it was animated. Therefore, many of the deformers are used to make the diaper look more natural when it takes its final form. As mentioned earlier, these deformers were used in conjunction with morph targets to make it easy to change any parameter according to the client’s wishes. Smaller leg holes? No problem. Just adjust the leg hole Taper deformers down a bit. More poofyness in the middle? Easy. Just slide up Pad Poof slider, which is connected to a morph target that adds more folds and cushioning in the middle area.A frequent comment was that the diaper looked too “full”, so by using a series of Bulge and FFD (Free Form Deformation) deformers, I was able to very quickly change the contour of the front and back of the diaper. All of these deformers’ strength parameters are linked to animation control sliders using Xpresso.
Click the images to see full versions.
For example, the strength of the left leg taper is the average of the total amount of bend that is the front and back left flaps. The front and back bulge and FFD deformer strength* are the combined averages of the front and back bend controls. By doing this, the diaper is able to retain its modeled, flat shape when fully unfolded, as none of the deformers are affecting it. As the diaper animates into its “on-the-baby” position, these deformers are slowly ramped up, resulting in a smooth transition. Throughout all this, the diaper remains simple to change at any time, given the fact that we’re not actually modifying any of the original geometry.

Wrinkles
The wrinkles were a surprisingly simple effect to create, using Cinema’s Spline Deformer. The first step was to define the shape and size of the wrinkles. I created several splines, two for each leg opening and two the front and back waistbands. Each leg opening had one spline for a horizontal wrinkle, and one spline for a vertical wrinkle. I then added many tiny curves and imperfections into each spline.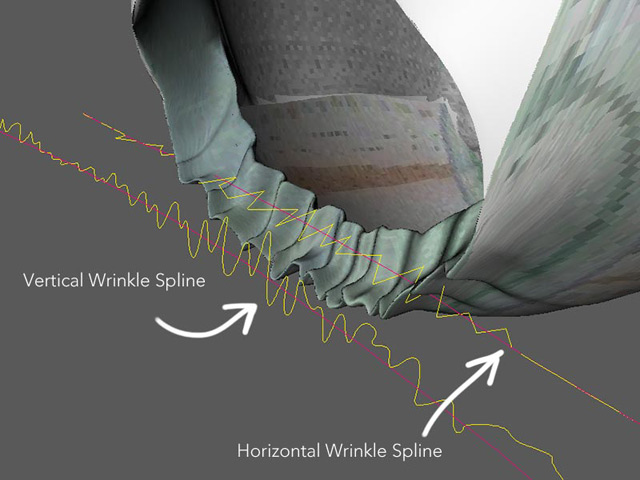
By using the Morph Tag, I was able to easily morph between fully wrinkled and fully flat versions of each spline, allowing me to adjust the level of wrinkle in each area. Using the Spline Deformer, I was then able to transfer the shape of the wrinkles in the splines onto the mesh without ever modifying the original geometry. Using Xpresso, I linked the front and back bend controls to the wrinkle morph targets; that way, the wrinkles would become larger when the diaper was folded up into its “on-the-baby” shape.
Fine Tuning
Several of the animations required special care in order to look just right. Mainly, each flap used a Cluster modifier in order to make it easy to move them around in ways the original bone system could not. A Cluster modifier is essentially a collection of vertices which you can move all at once, using a null object. This collection of points can also have a falloff curve, in order to ease the transition between clustered and non-clustered points. Additionally, several morph targets are used to tweak the mesh at various points, and to prevent any polygon clipping (intersection).Wrap-Up
All together, these effects combine to form a well-integrated system which allowed me to react to client feedback much faster than if I had resorted to modifying the original geometry. The system scaled very well with the animation, and I was able to continually tweak the diaper’s shape throughout the whole process by adding new deformers to the stack.And while a diaper demonstration video is not the most glamorous subject on which to demonstrate the techniques I’ve presented, it is certainly a very applicable real-world example when it comes to animating and modeling a complex object, especially when time and client feedback are especially important.
* Normally, as of C4D version 11.5, using a morph tag on an FFD deformer is impossible. The morph tag will not track the changes you make to the deformer points. Using this script, you can instead edit a polygon object (which you can use with the morph tag), and all of its points will be transferred to the FFD deformer.
About "3D Diaper Extravaganza", I woudl like to know, if it's possible, what 3d software is used.
For information, I usually work with Daz 3D Studio software and Poser 3d software.
Thanks a lot
Best regards
Audran DOAT
by Audran DOAT on May 6th 2012 at 10:14am
by Luxamillion on May 7th 2012 at 10:12am
by JJ on Jul 11th 2012 at 3:36am